The Journey from Script to Stage: My Theater Set Design Process
Introduction: Navigating the Creative Path
For anyone new to the process, this is a behind-the-scenes walkthrough of a theatre set-design workflow. A set designer transforms the words of a script into a practical, usable, clear representation of place and time.
The process moves from initial script analysis to detailed blueprints through artistry, collaboration, and attention to detail.
1. Script Analysis: Defining the Essentials
The first step on a new project is to read the script. Start with a skim, then read every line carefully while noting the elements essential to telling the story. Entrances, exits, key props, and specific spatial requirements belong on a list of must-haves.
These are the building blocks of the set, so they need to be correct. Keep the list as short as possible: what is essential to serving the action?
2. Sketching Ideas: From Paper to Possibilities
With the essentials in hand, begin sketching rough ideas on paper. This is a fluid, exploratory stage where possibilities are open and imagination can lead. When the concept grows beyond what a sketch can communicate, it is time to move into 3D.
3. Transition to 3D: Bringing Concepts to Life
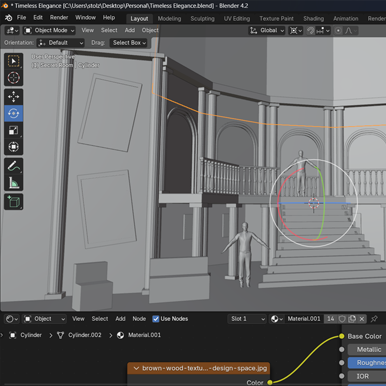
Blender, a powerful free 3D-modeling program, is useful for turning sketches into three-dimensional concepts. At this stage, the goal is to make the idea look good enough to sell the concept, not necessarily to model every detail perfectly.
Detailed work can wait unless the creative momentum carries the model farther.
4. Concept Presentation: Collaboration with the Director
Develop two or three distinct designs for a director. Discuss how each concept supports the production’s vision. One option may be a personal favorite, while the others can deliberately explore different approaches—such as a lower-budget version, a stronger middle option, and a more ambitious approach.
Be direct: there should be no emotional investment in a draft. Honest feedback is useful because anything can change.
Before the formal set presentation, meet with the lead builder. Confirm that the design can be built safely and practically. Their buy-in should come before the larger production meeting.
5. Refinement and Detailing: Perfecting the Vision
Once a concept is selected, return to the 3D model and refine it. Starting again can be helpful when the first concept was made quickly and without close attention to scale.
Fine-tune the overall proportions and smallest details. Add textures and adjust lighting to create a compelling representation of the set.
6. Rendering and Sharing: Bringing Designs to Life
Render high-quality images from several angles, including top views, then share them with the production team. At the production meeting, the set design anchors a conversation about the show’s visual world.
Clear, exciting imagery helps build investment across the team and encourages each department’s contribution.
7. Blueprint Creation: Guiding the Construction
Finally, export the 3D model into Rhino 3D or SketchUp to create blueprints. These documents guide construction and clearly communicate what to build, where it goes, how large it is, and how it will be used.
Builders already know how to build. The drawing should clearly communicate the design intent and relevant requirements. If a faux piano must support tap dancing, that information belongs on the drawing.